 In this post I will describe 2 methods to operate “remote controlled sockets” via the Raspberry Pi.
The methods differ in the used software. Both methods use C as development language and compile to native Raspberry Pi code (ELF 32-bit LSB executable, ARM, EABI5 version 1 (SYSV), dynamically linked).
The prerequisites and wiring are the same for both methods.
Prerequisites

Imported by: Electro Cirkel B.V. – Rotterdam bought at Action.

- RaspberryPi 2 – Model B – running Raspbian;
- Working (WLAN-)connection;
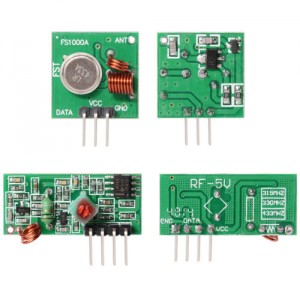
- 433MHz Transmitter/Receiver kit (buy for example at eBay or DealExtreme);
- Remote controlled sockets.
Hardware

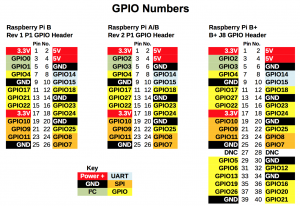
Raspberry Pi – A/B Rev 2 and Raspberry Pi 2 Model B GPIO pin outs (click to enlarge).
In this step you will learn how to electrically connect the transmitter and receiver to the Raspberry Pi.
Read at the printed circuit boards (PCBs) of the transmitter and the receiver the labels (VCC, GND and DATA).
Transmitter
Connect pin DATA to pin 11 (GPIO17), VCC to pin 2 (+5V) and GND to pin 6 (GND).
Receiver
Connect one of the DATA pins to pin 13 (GPIO27), VCC to pin 4 (+5V) and GND to pin 9 (GND).
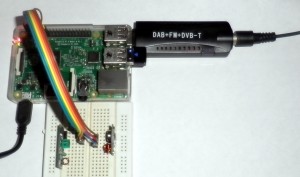
After connecting the transmitter and receiver to the Raspberry Pi, it could look like this. Don’t be distracted by the plugged in RTL-SDR USB stick. During development this stick was used to check whether a 433MHz signal was transmitted.

Method 1 – Wiring Pi / 433Utils
This method is based on the projects: Wiring Pi library and 433Utils.
Software
- Login at Raspberry Pi (password: raspberry)
ssh pi@raspberrypi
- Make sure Raspbian is up to date
sudo apt-get update && sudo apt-get upgrade
- Install extra packages
sudo apt-get install git-core build-essential
- Create working directory
mkdir ~/sockets && cd ~/sockets
- Download / Build / Install Wiring Pi
git clone git://git.drogon.net/wiringPi
cd wiringPi
./build
- Download / Build 433Utils
cd ~/sockets
git clone --recursive git://github.com/ninjablocks/433Utils.git
cd 433Utils/RPi_utils
make
Usage
- Listen for the codes transmitted by the remote control of the remote controlled sockets.
Start the sniffer, press each key of the remote (one at a time) and write down the received (decimal) codes. Sometimes you have to press the same key several times because the signal was not received correctly.sudo ./RFSniffer
Received codes:
on off 1 16115759 16115758 2 16115757 16115756 3 16115755 16115754 4 16115751 16115750 ALL 16115746 16115745 - Learn the remote controlled sockets to listen to your Raspberry Pi.
- Plug in a socket.
- Press and hold the button at the socket till the LED is blinking (+/- 5 seconds). Now the socket is ready to pair with your Raspberry Pi transmitter.
- Select one of the codes obtained using the sniffer to bind.
sudo ./codesend 16115758
The LED at the socket will blink fast to indicate it has been bound with the Raspberry Pi. When it doesn’t work the first time, just submit the code again. This is also a disadvantage of this kind of sockets, there is no feedback about whether the signal has been received in good condition. Good practice is to resend the same command several times after each other (i.e. 3x).
- Now switch the socket ON by the command:
sudo ./codesend 16115759
- …and OFF again by:
sudo ./codesend 16115758
- Pair the next socket with the Raspberry Pi. Plug in the socket, make sure the socket is in learning mode, select an unused code (i.e. 16115757) and submit it using codesend.
Enjoy playing with the sockets 🙂
Extra 1: Use the Wiring Pi command: gpio to see the pin out.
gpio readall
 +-----+-----+---------+------+---+---Pi 2---+---+------+---------+-----+-----+
 | BCM | wPi |   Name  | Mode | V | Physical | V | Mode | Name    | wPi | BCM |
 +-----+-----+---------+------+---+----++----+---+------+---------+-----+-----+
 |     |     |    3.3v |      |   |  1 || 2  |   |      | 5v      |     |     |
 |   2 |   8 |   SDA.1 |   IN | 1 |  3 || 4  |   |      | 5V      |     |     |
 |   3 |   9 |   SCL.1 |   IN | 1 |  5 || 6  |   |      | 0v      |     |     |
 |   4 |   7 | GPIO. 7 |   IN | 1 |  7 || 8  | 1 | ALT0 | TxD     | 15  | 14  |
 |     |     |      0v |      |   |  9 || 10 | 1 | ALT0 | RxD     | 16  | 15  |
 |  17 |   0 | GPIO. 0 |  OUT | 0 | 11 || 12 | 0 | IN   | GPIO. 1 | 1   | 18  |
 |  27 |   2 | GPIO. 2 |   IN | 0 | 13 || 14 |   |      | 0v      |     |     |
 |  22 |   3 | GPIO. 3 |   IN | 0 | 15 || 16 | 0 | IN   | GPIO. 4 | 4   | 23  |
 |     |     |    3.3v |      |   | 17 || 18 | 0 | IN   | GPIO. 5 | 5   | 24  |
 |  10 |  12 |    MOSI |   IN | 0 | 19 || 20 |   |      | 0v      |     |     |
 |   9 |  13 |    MISO |   IN | 0 | 21 || 22 | 0 | IN   | GPIO. 6 | 6   | 25  |
 |  11 |  14 |    SCLK |   IN | 0 | 23 || 24 | 1 | IN   | CE0     | 10  | 8   |
 |     |     |      0v |      |   | 25 || 26 | 1 | IN   | CE1     | 11  | 7   |
 |   0 |  30 |   SDA.0 |   IN | 1 | 27 || 28 | 1 | IN   | SCL.0   | 31  | 1   |
 |   5 |  21 | GPIO.21 |   IN | 1 | 29 || 30 |   |      | 0v      |     |     |
 |   6 |  22 | GPIO.22 |   IN | 1 | 31 || 32 | 0 | IN   | GPIO.26 | 26  | 12  |
 |  13 |  23 | GPIO.23 |   IN | 0 | 33 || 34 |   |      | 0v      |     |     |
 |  19 |  24 | GPIO.24 |   IN | 0 | 35 || 36 | 0 | IN   | GPIO.27 | 27  | 16  |
 |  26 |  25 | GPIO.25 |   IN | 0 | 37 || 38 | 0 | IN   | GPIO.28 | 28  | 20  |
 |     |     |      0v |      |   | 39 || 40 | 0 | IN   | GPIO.29 | 29  | 21  |
 +-----+-----+---------+------+---+----++----+---+------+---------+-----+-----+
 | BCM | wPi |   Name  | Mode | V | Physical | V | Mode | Name    | wPi | BCM |
 +-----+-----+---------+------+---+---Pi 2---+---+------+---------+-----+-----+
Extra 2: Use the Wiring command: gpio to see the exports.
gpio exports
GPIO Pins exported:
  17: out  0  none
  27: in   0  none
Read more
Method 2 – Patrik Schmitz (no extra dependencies)
This method has been created by Patrik Schmitz (credits to him), I translated it to English and stored it here, mainly for own reference. It is based on recording the original 433MHz signal transmitted by the remote control and playing it back via the transmitter.
Software
- Login at Raspberry Pi (password: raspberry)
ssh pi@raspberrypi
- Make sure Raspbian is up to date
sudo apt-get update && sudo apt-get upgrade
- Install extra packages
sudo apt-get install build-essential
- Create working directory
mkdir -p ~/sockets/PatrikSchmitz && cd ~/sockets/PatrikSchmitz
- Create sources files
Now create in this directory three source files: receive.c, record.c and transmit.c. Make sure the path to the GPIOs is correct in the files.
For the two receiving programs (receive.c and record.c) this must be: /sys/class/gpio/gpio27/value because the 433MHz receiver is connected to Raspberry Pi 2 – Model B pin 13 (GPIO27). For the sending part (transmit.c) this must be /sys/class/gpio/gpio17/value because the 433MHz sender is connected to pin 11 (GPIO17).
receive.c/** * Copyright (c) 2014 Patrik Schmitz * * Permission is hereby granted, free of charge, to any person obtaining a copy * of this software and associated documentation files (the "Software"), to deal * in the Software without restriction, including without limitation the rights * to use, copy, modify, merge, publish, distribute, sublicense, and/or sell * copies of the Software, and to permit persons to whom the Software is * furnished to do so, subject to the following conditions: * * The above copyright notice and this permission notice shall be included in * all copies or substantial portions of the Software. * * THE SOFTWARE IS PROVIDED "AS IS", WITHOUT WARRANTY OF ANY KIND, EXPRESS OR * IMPLIED, INCLUDING BUT NOT LIMITED TO THE WARRANTIES OF MERCHANTABILITY, * FITNESS FOR A PARTICULAR PURPOSE AND NONINFRINGEMENT. IN NO EVENT SHALL THE * AUTHORS OR COPYRIGHT HOLDERS BE LIABLE FOR ANY CLAIM, DAMAGES OR OTHER * LIABILITY, WHETHER IN AN ACTION OF CONTRACT, TORT OR OTHERWISE, ARISING FROM, * OUT OF OR IN CONNECTION WITH THE SOFTWARE OR THE USE OR OTHER DEALINGS * IN THE SOFTWARE. */ #include <stdio.h> #include <stdlib.h> #include <string.h> #include <sys/time.h> int idle = 1; double time_diff(struct timeval x, struct timeval y) { double x_ms , y_ms , diff; x_ms = (double)x.tv_sec*1000000 + (double)x.tv_usec; y_ms = (double)y.tv_sec*1000000 + (double)y.tv_usec; diff = (double)y_ms - (double)x_ms; return diff; } int main() { FILE *filehandle; char buffer[1]; char state[1]; struct timeval start; struct timeval current; struct timeval timeout; start = (struct timeval){0}; timeout = (struct timeval){0}; filehandle = fopen("/sys/class/gpio/gpio27/value", "r"); if(filehandle != NULL) { while(1) { fflush(filehandle); if(fseek(filehandle, 0, SEEK_SET) == 0) { fread(buffer, 1, 1, filehandle); if(strcmp(buffer, state) != 0) { gettimeofday(¤t, NULL); gettimeofday(&timeout, NULL); if(start.tv_sec != 0) { printf("[TIME] %.0f us\n", time_diff(start, current)); } strcpy(state, buffer); if(strcmp(state, "1") == 0) { printf("[GPIO] High\n"); } else { printf("[GPIO] Low\n"); } idle = 0; gettimeofday(&start, NULL); } else { gettimeofday(¤t, NULL); if(!idle && ((timeout.tv_sec + 2) < current.tv_sec)) { gettimeofday(&timeout, NULL); printf("[INFO] --------------------------------------------------\n"); printf("[INFO] idle\n"); printf("[INFO] --------------------------------------------------\n"); idle = 1; } } } } } return 0; }record.c
/** * Copyright (c) 2014 Patrik Schmitz * * Permission is hereby granted, free of charge, to any person obtaining a copy * of this software and associated documentation files (the "Software"), to deal * in the Software without restriction, including without limitation the rights * to use, copy, modify, merge, publish, distribute, sublicense, and/or sell * copies of the Software, and to permit persons to whom the Software is * furnished to do so, subject to the following conditions: * * The above copyright notice and this permission notice shall be included in * all copies or substantial portions of the Software. * * THE SOFTWARE IS PROVIDED "AS IS", WITHOUT WARRANTY OF ANY KIND, EXPRESS OR * IMPLIED, INCLUDING BUT NOT LIMITED TO THE WARRANTIES OF MERCHANTABILITY, * FITNESS FOR A PARTICULAR PURPOSE AND NONINFRINGEMENT. IN NO EVENT SHALL THE * AUTHORS OR COPYRIGHT HOLDERS BE LIABLE FOR ANY CLAIM, DAMAGES OR OTHER * LIABILITY, WHETHER IN AN ACTION OF CONTRACT, TORT OR OTHERWISE, ARISING FROM, * OUT OF OR IN CONNECTION WITH THE SOFTWARE OR THE USE OR OTHER DEALINGS * IN THE SOFTWARE. */ #include <stdio.h> #include <stdlib.h> #include <string.h> #include <sys/time.h> FILE *filehandle; FILE *record; int idle = 1; int length = 0; double difference; char buffer[1]; char state[1]; char *temporary; struct timeval start; struct timeval current; struct timeval timeout; double time_diff(struct timeval x, struct timeval y) { double x_ms , y_ms , diff; x_ms = (double)x.tv_sec*1000000 + (double)x.tv_usec; y_ms = (double)y.tv_sec*1000000 + (double)y.tv_usec; diff = (double)y_ms - (double)x_ms; return diff; } int main() { start = (struct timeval){0}; timeout = (struct timeval){0}; filehandle = fopen("/sys/class/gpio/gpio27/value", "r"); record = fopen("record.dat", "w+"); if((filehandle != NULL) && (record != NULL)) { while(1) { fflush(filehandle); if(fseek(filehandle, 0, SEEK_SET) == 0) { fread(buffer, 1, 1, filehandle); if(strcmp(buffer, state) != 0) { gettimeofday(¤t, NULL); gettimeofday(&timeout, NULL); difference = time_diff(start, current); if(start.tv_sec != 0) { length = snprintf(NULL, 0, "d:%0.f\n", difference); temporary = malloc(length * sizeof(char)); sprintf(temporary, "d:%0.f\n", difference); fwrite(temporary, 1, strlen(temporary), record); // printf("[TIME] %.0f us\n", difference); } strcpy(state, buffer); length = snprintf(NULL, 0, "s:%s\n", state); temporary = malloc(length * sizeof(char)); sprintf(temporary, "s:%s\n", state); fwrite(temporary, 1, strlen(temporary), record); if(strcmp(state, "1") == 0) { // printf("[GPIO] High\n"); } else { // printf("[GPIO] Low\n"); } idle = 0; gettimeofday(&start, NULL); } else { gettimeofday(¤t, NULL); if(!idle && ((timeout.tv_sec + 2) < current.tv_sec)) { gettimeofday(&timeout, NULL); printf("[INFO] --------------------------------------------------\n"); printf("[INFO] idle\n"); printf("[INFO] --------------------------------------------------\n"); idle = 1; break; } } } } fclose(filehandle); fclose(record); } return 0; }transmit.c
/** * Copyright (c) 2014 Patrik Schmitz * * Permission is hereby granted, free of charge, to any person obtaining a copy * of this software and associated documentation files (the "Software"), to deal * in the Software without restriction, including without limitation the rights * to use, copy, modify, merge, publish, distribute, sublicense, and/or sell * copies of the Software, and to permit persons to whom the Software is * furnished to do so, subject to the following conditions: * * The above copyright notice and this permission notice shall be included in * all copies or substantial portions of the Software. * * THE SOFTWARE IS PROVIDED "AS IS", WITHOUT WARRANTY OF ANY KIND, EXPRESS OR * IMPLIED, INCLUDING BUT NOT LIMITED TO THE WARRANTIES OF MERCHANTABILITY, * FITNESS FOR A PARTICULAR PURPOSE AND NONINFRINGEMENT. IN NO EVENT SHALL THE * AUTHORS OR COPYRIGHT HOLDERS BE LIABLE FOR ANY CLAIM, DAMAGES OR OTHER * LIABILITY, WHETHER IN AN ACTION OF CONTRACT, TORT OR OTHERWISE, ARISING FROM, * OUT OF OR IN CONNECTION WITH THE SOFTWARE OR THE USE OR OTHER DEALINGS * IN THE SOFTWARE. */ #include <stdio.h> #include <stdlib.h> #include <string.h> #include <sys/time.h> FILE *filehandle; FILE *gpio; char *data; char buffer[32]; char *source = "record.dat"; int main(int argc, char *argv[]) { if(argc == 2) { source = argv[1]; } filehandle = fopen(source, "r"); gpio = fopen("/sys/class/gpio/gpio17/value", "w"); if(gpio == NULL) { printf("could not open gpio pin\n"); } if((filehandle != NULL) && (gpio != NULL)) { while(fgets(buffer, sizeof(buffer), filehandle) != NULL) { fflush(gpio); data = strtok(buffer, ":"); if(data != NULL) { if(strcmp(data, "s") == 0) { data = strtok(NULL, ":"); data[strlen(data) - 1] = '\0'; if(strcmp(data, "1") == 0) { fwrite("1", 1, 1, gpio); } else { fwrite("0", 1, 1, gpio); } } else if(strcmp(data, "d") == 0) { data = strtok(NULL, ":"); data[strlen(data) - 1] = '\0'; usleep(atoi(data)); } } } /* turn sending off */ fwrite("0", 1, 1, gpio); fclose(filehandle); fclose(gpio); } return 0; } - Compile source files
gcc -o receive receive.c
gcc -o record record.c
gcc -o transmit transmit.c
Usage
- Now configure the GPIO.
Tell the Raspberry Pi we like to use GPIO17 and 27:sudo echo "17" > /sys/class/gpio/export sudo echo "27" > /sys/class/gpio/export
… and set GPIO17 as output:
sudo echo "out" > /sys/class/gpio/gpio17/direction
- Record the signals
Execute the command record, press a key on the remote control (+/- 2 seconds) and stop the record program (CTRL+C).sudo ./record
Now rename the file which contains the recorded data (record.dat) to a name which corresponds to the name of the pressed button i.e. 1_on.dat Repeat these steps for each button.
- Pair the Raspberry Pi with the socket
Plug in a socket, make sure it is in learning mode (press button on socket till it’s blinking 5 seconds). Now play back one of the recorded signals:sudo ./transmit 1_on.dat
The LED at the socket should start blinking fast.
- Switch on/off the socket
Playback the key 1 ON signal to switch ON the socket:sudo ./transmit 1_on.dat
…playback the key 1 OFF signal to switch OFF the socket:
sudo ./transmit 1_off.dat
Enjoy playing with the sockets 🙂
