 When buying my house we went during the visit also to the basement. At this place the so called Mercedes of the house was installed: The Vitola 200 oil-fired heating/boiler controlled by the Vitotronic 200 type KW2 produced by the firm Viessmann. Installation and material was about 6000 euro when checking the invoice. Maybe this heating is a bit too luxurious, expensive, large in size and overkill for my house, but anyway it is there and it is a good one.
Interface cable
Big advantage is that there is a service connection which can be used to monitor the heating but also to set heating programs of heating and warm water facility and a lot of parameters of the device itself. This service connection is a well hidden feature of the two control lights (power/malfunction) in front of the Vitotronic. Normally a technician uses a so called Optolink (original about €100) at one side connected to his/her laptop running ‘Vitosoft 200 ServiceControl’-software and at the other side ‘plugged in’ at this service connection. Not really ‘plugged in’ because this optolink consists actually of a LED (light emitting diode) to send data and a photo transistor to receive data. This construction guarantees an elegant galvanic isolation between heating device and laptop.
Open Source project – Hardware

At the Internet I have found a great open source project called OpenV. This project with wiki and sourcecode repository describes how to build your own Optolink-cable. There are multiple versions available with RS-232 or USB- serial interfaces. I decided not to solder the optolink interface myself but buy a ready one from the OpenV-site (€ 37,50 incl. shipping) . This a USB-version with SMD-components (surface mounted devices) which is build up around the virtual comport chip of Future Technology Devices International (FTDI), the so called: FT232RL. This integrated circuit (IC) converts the TX (transmit) and RX (receive) signals respectively to the LED and from the photo transistor to USB-signals. When connecting this optolink interface to my Linux-computer it was recognized as ‘FTDI FT232BM Compatible converter‘ and accessible at: /dev/usb/tts/0 See also ‘DMESG log messages after connecting the optolink’ at the end of this article.
Placed the interface in front of the two control LEDs of the Vitotronic, at the optolink a green and red LED blinked when sending and receiving data to and from Vitotronic.
Open Source project – Software

Next step is to send commands via this optolink to the heating device. At the OpenV-site you will find software for MS Windows and Linux. I decided to use the Linux software. This software consists basically of two parts, a daemon called ‘vcontrold‘ and a client called ‘vcontrol‘. Source code of both is available so you can make adjustments and build it for your own target environment. Configuration of commands and daemon is done using XML-files. The vito.xml-file describes the Vitotronic protocol. This means it describes which value you have to send to which address to execute a command at the heating device. Besides of that it describes how many bytes you will receive as answer. The file: vcontrold.xml is the configuration of the daemon.
As minimum you have to start the daemon, the client program is optional. After starting the daemon there is a telnet interface available to you. Check vcontrold.xml for port number. With the command: ‘commands’ you get a list of configured commands. With the command ‘getTempA’ you will get the outside temperature for example.
vctrld>getTempA
17.000000 Grad Celsius
User friendly?
Okee these steps are nice as a proof-of-concept: Yes it is possible to control you Viessmann heating with do it yourself (DIY) components and software. But the current solution is not so user friendly. Imagine: A laptop standing on top of the heating in the basement and a command line interface to operate the heating.
So we do have to change two things:
- It must be possible to control the heating from the living room. Even from the whole world maybe via the Internet?
- It must be possible to control the heating with a great graphical user interface. Maybe also monitor the current status of the heating? Is the heating/boiler pump running, what is the (history) of the outside temperature?
To meet requirement one I realized myself that I needed a device running Linux, with a USB-interface and network-connectivity. In the basement I don’t have wired LAN-connections so WiFi was the only solution. The device I have chosen for this is the Asus Wireless Harddisk drive (Asus WL-HDD) equipped without harddisk. In this way a kind of solid state device remains. I bought this Asus WL-HDD for some euros via Ebay.
Operating System
At the Asus WL-HDD I installed the OpenWrt distribution of Linux. See also Networkconfiguration OpenWrt on a Asus WL-HDD (dutch). I cross-compiled the vcontrol client and daemon as MIPS-versions. See also: Compile software for OpenWrt (dutch).
Data storage
Because there is no harddisk in my Asus WL-HDD, storage of data must be done at another computer.
I decided to store these data in a MySQL-database:
- Burner status (on/off)
- Heating/boiler pumps statuses (on/off)
- Current/desired boiler water temperature
- Outside temperature
- Flow temperature
- Burn hours
At the computer which is running the MySQL-database, I periodically execute a script (crontab) which is requesting data from VControl and stores this data in the database.
As I told you before, VControl is also accessible via the VControl-client. You can use this client to execute some commands like requesting the values mentioned above. One can adjust the way VControl-client reports these values by supplying a template. I created a template so the reported values fit perfectly in my SQL-insert query.
Because VControl-client is running at another machine (the Asus WL-HDD), I have to connect to this machine using SSH. It is not desired to supply the password every time when the script is executed, so use SSH RSA Private/Public keys. The script doesn’t go in interactive shell, but executes exactly one command: vcontrol-client supplemented with the commands to be executed via the optolink and the template which describes how to report the values back. These values are wrapped into the insert query and this query is executed at the MySQL-database.
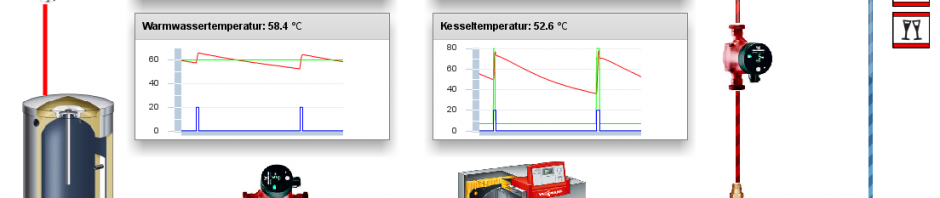
Display measured data
Now, we would like to display these stored data in an attractive way. I decided to use Adobe Flex for this. I drawed a schematic installation diagram where it is possible to animate the flow of heating and warm water circuits. Besides of that the burner can be animated. In the Flex-application the historical values of temperatures are displayed in zoom-able graphs. The back-end of this Flex-application is PHP. Read the article ‘Adobe Flex with a PHP back-end‘ how to implement this.
Switching operating mode
I also would like to switch operating mode from ‘off’ to ‘(warm water) heating‘. These commands are send via the telnet interface of the VControl-daemon. Because the telnet interface of VControld is not protected by a password and data send via telnet is not encrypted, I decided not to expose the telnet interface at the external network interface of the Asus WL-HDD. The only way to access the telnet interface of VControl-deamon is now from within the Asus WL-HDD (localhost). But.. the back-end of the Graphical User Interface (the Flex-application) resides at another host. Solution: setup a tunnel from a TCP-port at the other host to the VControld-telnet port at the Asus WL-HDD. Now the VControl-daemon telnet interface is accessible as if it is running at the host which also serves the back-end of the Flex-application. Use for authentication the SSH RSA Private/Public solution mentioned above. The traffic through the tunnel (and so the telnet commands) are encrypted.
In PHP a small telnet client is implemented which sends the commands which are requested via the Flex-front-end to the VControl-daemon. The status feedback: is the command executed correctly, is also reported back via the telnet interface.
Read more
- OpenV
- Vitola 200 (dutch)
- CV Tuning – Onderzoek (dutch)
DMESG log messages after connecting the optolink
usb.c: registered new driver serial
usbserial.c: USB Serial support registered for Generic
usbserial.c: USB Serial Driver core v1.4
usbserial.c: USB Serial support registered for FTDI SIO
usbserial.c: USB Serial support registered for FTDI 8U232AM Compatible
usbserial.c: USB Serial support registered for FTDI FT232BM Compatible
usbserial.c: USB Serial support registered for USB-UIRT Infrared Tranceiver
usbserial.c: USB Serial support registered for Home-Electronics TIRA-1 IR Transceiver
ftdi_sio.c: v1.3.5:USB FTDI Serial Converters Driver
hub.c: new USB device 00:04.0-1, assigned address 2
usbserial.c: FTDI FT232BM Compatible converter detected
usbserial.c: FTDI FT232BM Compatible converter now attached to ttyUSB0 (or usb/tts/0 for devfs)